Showing posts with label Yard &Garden Projects. Show all posts

"Life Is Better On the Deck"

Painted pallet sign
 Normally, at this time of year, I wouldn't be saying, 
"Life is Better on the Deck"!
  But we had one of the nicest November weekends that I can remember.
   Several months ago, Danny decided to try making signs out of pallet wood....that was until he discovered how difficult pallets are to take apart. You can read about that here- Pallet Walkway Cheat. He did, however, manage to get a few boards put together...all that was left to do was add words. 

pallet board sign

  I decided to give it it try myself...after all, how hard could it be to write some words on a board? Turns out...pretty hard, when you don't have stencils. 
I didn't let that stop me. I wrote out the words in bubble letters on paper, cut them out, then traced around them...sort of. Have you ever written on rough wood with a pencil? I think I know why Danny gave up on this project.


Cutting paper letters out for sign

  I'm not sure you can see it, but there ARE words printed on there...

words penciled on pallet wood

Here's a close up...
funny, I never noticed until AFTER I painted the words 
that there's no space between the 'e' and the 'i'...
Guess I should have checked the photo first.
That would have saved me a lot of work.
However, it did make me appreciate latex paint!

words pencilled on pallet boards

Still not great...maybe I should have let Danny do it.

Pallet sign

Oh well...the quality of the sign isn't the best, but the quality of our life is....
especially when we can sit on our deck in November,
and watch our evening visitors.


Three deer, viewed from the deck
Photo by Brian Bolack, using Canon EOS Rebel T4i


Pallet sign with sunset behind

Yup, Life is Better on the Deck!

Pallet sign

DIY Patio Planters

diy planters

  After all the work of building our house, there wasn't much left in the budget for completing the outdoor living areas. For the first two years that we lived here, the area at our front entrance was just gravel and weeds. No matter how many times I went and dug up the weeds, and raked the area, it was still a pretty sad entrance to our home! Paving stones and stacked block planters weren't something we could afford, so we had to find less costly materials to complete our patios. 
  
  Concrete patio blocks aren't the fanciest material, but they served our purpose. Finally, the gravel was covered, and I didn't have to worry about it being tracked into the house!
Patio off deck
Patio blocks laid

   By the time the patio blocks were laid, I had come up with an idea of how we could cover the retaining wall by the driveway. I love how I can present an idea, and Brian comes up with the plan!

  The planter is constructed from treated lumber, but lined with pieces of styrofoam insulation we already had.(scavenged treasures!) The purpose for the styrofoam was mainly filler, to save on soil, and also to keep moisture away from the wood. Landscape fabric lines the inside. 

Patio, building DIY planter

  The outside of the frame is covered with fence boards, and the cap is 2x6 treated lumber. We filled the bottom of the planter with sand, then a mix of peat moss, and soil. We bought a few bags of soil, to avoid planting weed seeds in our new planter. So far, it's worked; we have very few weeds!

Patio, planter, furniture
Finished planter with fence boards along the front and 2x6 cap
  We still have to finish off the top of the concrete wall, but that's a project for another time. 


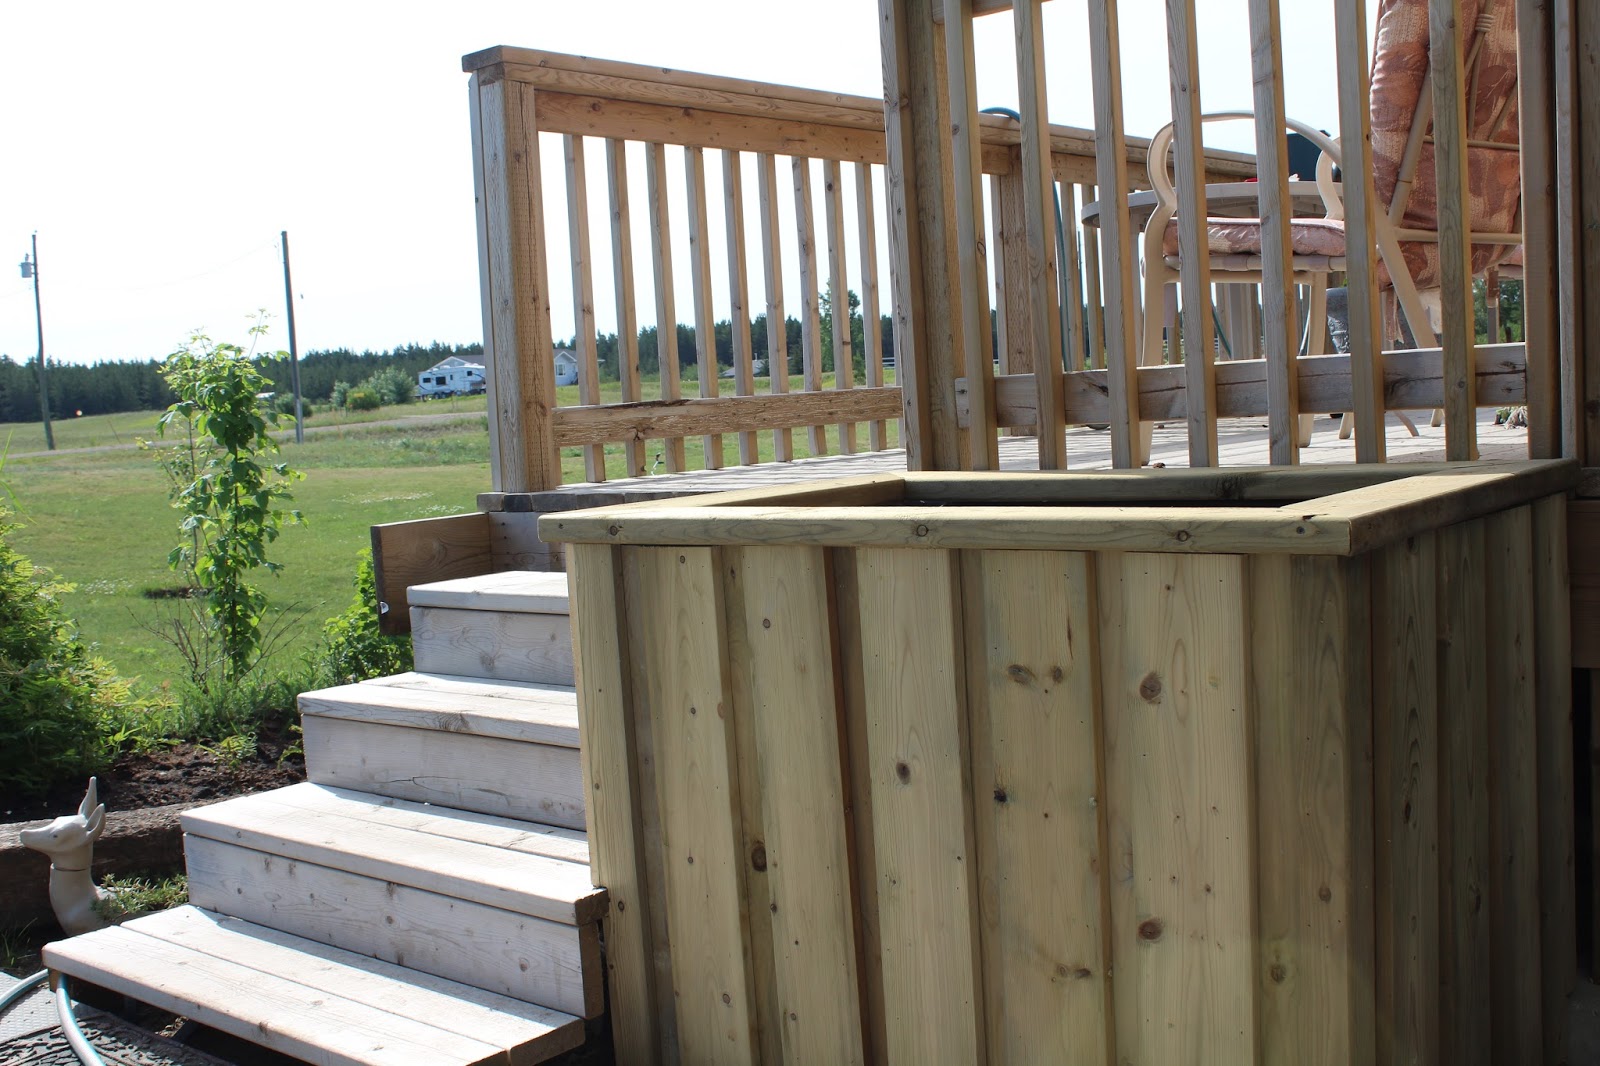
  Brian built this next planter one day while I was away visiting my mom....I love coming home to surprises like this! It's built the same way as the one along the retaining wall, but because it's quite tall, we put some big logs in the bottom that will eventually break down. (our attempt at hugelkultur)  As the soil settles, we just top it up each year.

Steps from patio to deck, planter beside steps


planter beside deck stairs
Planter beside the deck completed!


Deck and stair rail
And a handrail to make the building inspector happy!

Petunias in planter
We filled the planter with petunias from a hanging basket. 
They fit perfectly and spread beautifully!
DIY deck planter, petunias

Patio, planters filled with petunias, patio furniture
Planters finished, filled  and planted....another project done.
Well, except the staining...that's a whole other project!

  Finally, a nice welcoming entrance to our home...just don't trip on the garden hose on your way in!

DIY Garden Gazebo


green and white gazebo constructed of wood
  After enjoying some time sitting in our son's screened in porch, I was wishing we could add a little retreat to our own house. At the time we were living in a bungalow that already had an addition. Our house design just didn't lend itself to such a renovation project....we'd have to come up with an alternative.
    It took some thinking, and researching, but I finally came up with an idea. I sketched it out and showed it to Brian. As usual, he took my idea, and ran with it.  He didn't get a plan or a kit....he just started building, and figuring it out as he went along. It took some time, and a lot of interruptions, but the finished product was better than I could have hoped for.

man giving thumbs up building gazebo

We're off to a good start! My boys in the background are so little!


floor construction hexagon gazebo

Brian extended our deck around the corner and added the gazebo a few feet out from the house.

floor and wall construction hexagon gazebo

Corner posts are in place.

building hexagon gazebo

Hmmm...maybe I should just back away, and let him work.

floor and wall construction hexagon gazebo

Deep in thought, or just exhausted?

roof supports hexagon gazebo

Roof supports going up

construction hexagon gazebo

Starting to close in the walls.

staining hexagon gazebo

Danny and I helped out with the staining....notice how talented I am....I can still talk on the phone, even when I'm working!

removable screens hexagon gazebo

8 gallons of stain later! The window screens are removable for cleaning and storing. The screen around the top is stapled in.

removable screens on hexagon gazebo

The door is on, and the soffit and fascia are up.


DIY screened in hexagon gazebo

Later, we added two brick planters around the gazebo.

steps down from deck to patio behind gazebo

These steps lead down behind the gazebo to another patio. I loved this little corner!

Steps from deck to patio with stacked stone planters

The other planter

steps to patio

This is looking down from the deck to the patio.

stacked stone planter in front of deck

This is the front of the gazebo.

green and white hexagon gazebo

Project completed!

inside screened in hexagon gazebo

And it was worth all the work to have this lovely place to sit! 


  I was hard to leave that gazebo when we moved, but this time we made sure to include a back porch in our house plans. All that's left to do is add the screens, and I'll have that little retreat I wanted years ago!


Pallet Walkway Cheat

  
pallet project

  I'm sure you've seen all of those amazing pallet projects on Pinterest, just like I have. Maybe you even went out and picked up some pallets, with great plans for all the awesome things you could create.....and maybe you learned some of the same things I did................
First, I found out that pallets make a lovely backdrop for wild flowers!


 The year after we built our house, I started on a big project in our back yard....a pallet walkway. Because our yard is pure sand, I figured we could save on some top soil, by making wooden walkways insted of paths. I got all of the pallets into place, and they looked great, except the gaps between the boards needed filled....which would require dismantling other pallets. 


That's when I found out what you probably already know....it's a lot of work to take pallets apart. I even recruited my boys to help take them apart, but they gave up after several boards coming off in splinters. 
  So, my walkway sat there, unfinished. After a couple of years, the weeds had moved in, and my dreams of a beautiful boardwalk through the garden were growing dim....pieces of plywood laid on top of the pallets wasn't quite what I had in mind.


Then this spring, I decided to just pull out the pallets and redo the entire walkway...nope I wasn't ready to give up. I ended up replacing the pallets with new ones, and moved the walkway to a new area....and again it sat unfinished. But then, Brian had a great idea...forget dismantling pallets, he'd just buy treated fence boards, and lay them length ways on top of the pallets.


Jeremy helped out too....so much easier than taking pallets apart!


He even found a way to make the project fun!

Hmmm...I wonder if this is how he'll look when I bring up the next project!


Not as inexpensive as a true pallet boardwalk; the fence boards cost about $100, but it's done, and we have a nice clean pathway from the patio to the back door.


Where the pathway used to be is now more garden space.


And I can sit on my patio and enjoy the view...
while I think of the next project for Brian to do.
Yup, I learned a lot through this pallet project...
But one thing I already knew....
My husband is a pretty smart fella!